Matilda Cake in Cup is the perfect quick and easy chocolate treat for dessert lovers. Inspired by the famous chocolate cake from the Matilda movie, this single-serve mug cake is rich, fudgy, and incredibly satisfying. The best part? You don’t need an oven—just a microwave and a few simple ingredients!
In just five minutes, you can make a warm, gooey Matilda cake in a cup using basic pantry staples like flour, cocoa powder, sugar, milk, and butter. Whether you’re craving a midnight snack or need a last-minute dessert, this microwave cake is the perfect choice.
In this post, we’ll guide you through each step of the recipe, share expert tips to get the best texture, and suggest fun variations to customize your mug cake. Get ready to enjoy a delicious, chocolatey treat—quick, simple, and utterly irresistible!
Why You’ll Love This Matilda Cake in Cup Recipe
There’s something special about enjoying a Matilda Cake in Cup—a warm, rich, and gooey chocolate dessert that’s inspired by the legendary chocolate cake from the Matilda movie. This recipe is perfect for those who love indulgent treats but don’t want to spend hours in the kitchen. Whether you’re looking for a quick chocolate fix, an easy dessert for one, or a no-fuss baking experience, this Matilda Cake in Cup recipe is guaranteed to satisfy your cravings.
A Quick and Easy Matilda Cake in Cup Recipe
One of the best reasons to try this Matilda Cake in Cup recipe is its speed and simplicity. Traditional cakes require measuring, mixing, baking, and cooling, which can take over an hour. This mug cake, however, is ready in just 5 minutes, making it an excellent choice for:
- Busy days when you don’t have time to bake.
- Late-night chocolate cravings that need an instant fix.
- Kids and beginner bakers who want to make an easy treat.
- Quick dessert for guests without the hassle of making a full cake.
With just a few basic ingredients and a microwave, you can whip up this rich chocolate cake in a cup in no time.
No-Oven Matilda Cake in Cup – Perfect for Small Kitchens
Not everyone has access to an oven, and even those who do might not always want to turn it on—especially in warm weather. This Matilda Cake in Cup is cooked entirely in the microwave, eliminating the need for preheating, baking trays, or long waiting times.
This makes it an ideal dessert for:
- College students living in dorms with limited cooking appliances.
- Office workers looking for a quick dessert break.
- Anyone with a small kitchen or no oven access.
- Those who want a treat without the extra dishes and cleanup.
By using the microwave, you not only save time and effort, but you also get a warm, decadent cake in less than two minutes!
Rich and Gooey Matilda Cake in Cup – A Chocolate Lover’s Dream
If you love deep, intense chocolate flavors, then this Matilda Cake in Cup will exceed your expectations. Made with real cocoa powder, this cake is incredibly moist, fudgy, and bursting with chocolatey goodness. Every bite is soft and rich, just like the famous cake in Matilda.
For an even more indulgent experience, you can:
- Add chocolate chips for melty pockets of chocolate.
- Swirl in Nutella or peanut butter for extra creaminess.
- Drizzle with chocolate sauce for a dessert that feels straight out of a bakery.
- Serve with whipped cream or vanilla ice cream for a truly indulgent treat.
This mug cake is pure chocolate heaven in every spoonful!
Perfectly Portioned Matilda Cake in Cup – No Leftovers, No Waste
Sometimes, making a full-sized cake isn’t practical. Maybe you don’t want leftovers sitting around, or you just need a single serving dessert that’s fresh and satisfying. This Matilda Cake in Cup is designed to be the perfect portion for one, allowing you to enjoy a homemade dessert without overindulging or worrying about storage.
This makes it great for:
- Solo chocolate lovers who want a fresh treat every time.
- Portion control—you get a perfect dessert without making a whole cake.
- Experimenting with different flavors—each time, you can tweak the recipe to try new add-ins or toppings.
Since it’s made fresh in minutes, there’s no need to store leftovers—just mix, microwave, and enjoy!
Final Thoughts on Matilda Cake in Cup
This Matilda Cake in Cup recipe is the ultimate quick, easy, and indulgent dessert for any chocolate lover. It’s rich, fudgy, and deeply chocolatey, yet so simple to make. With no oven required, minimal ingredients, and a fast microwave cooking time, this is a must-try recipe for anyone looking for a single-serve cake that delivers big on flavor.
Next time you’re craving chocolate, skip the store-bought treats and make this Matilda Cake in Cup instead—you won’t regret it! 🍫☕✨
Ingredients You’ll Need for Matilda Cake in Cup
To make this Matilda Cake in Cup, you’ll only need a few simple ingredients—most of which are probably already in your pantry. These ingredients work together to create a rich, moist, and fudgy texture, just like the famous chocolate cake from the Matilda movie.
Basic Ingredients for Matilda Cake in Cup
Each ingredient plays a crucial role in achieving the perfect mug cake texture. Here’s what you’ll need:
- All-Purpose Flour (4 tbsp) – The base of the cake, providing structure and ensuring a soft texture.
- Granulated Sugar (2 tbsp) – Sweetens the cake and enhances the chocolate flavor.
- Unsweetened Cocoa Powder (2 tbsp) – Gives the cake its rich, deep chocolate flavor. Use Dutch-processed cocoa for an even more intense chocolatey taste.
- Baking Powder (¼ tsp) – Helps the cake rise in the microwave, making it fluffy rather than dense.
- Salt (a pinch) – Enhances all the flavors and balances the sweetness.
Wet Ingredients for Moisture and Richness
- Milk (3 tbsp) – Adds moisture, ensuring the cake doesn’t turn out dry. Use whole milk for a richer texture or almond milk for a dairy-free version.
- Melted Butter (2 tbsp) – Brings in richness and flavor while keeping the cake moist. You can also use vegetable oil as a substitute for an even softer texture.
- Vanilla Extract (½ tsp) – Enhances the overall flavor and gives the cake a warm, aromatic touch.
Optional Add-Ins for Extra Flavor
To customize your Matilda Cake in Cup, try adding some of these delicious extras:
- Chocolate Chips (1 tbsp) – Melts inside the cake, making it extra gooey and indulgent.
- Nutella or Peanut Butter (1 tbsp) – Adds a creamy, rich filling in the center of the cake.
- Espresso Powder (¼ tsp) – Intensifies the chocolate flavor, making it taste even more decadent.
- Cinnamon (¼ tsp) – Adds a warm spice note that pairs beautifully with chocolate.
- Sea Salt Flakes (a sprinkle on top) – Enhances the chocolate flavor and gives the cake a gourmet touch.
Best Mug to Use for Matilda Cake in Cup
Since this Matilda Cake in Cup is made in the microwave, choosing the right mug is essential for an even bake. Here’s what to keep in mind:
- Microwave-Safe Mug – Use ceramic or glass mugs that can handle microwave heat. Avoid metal or mugs with metallic designs.
- Size Matters – A mug with at least 12 ounces (350ml) capacity prevents overflow while baking.
- Tall & Wide Mugs Work Best – A taller mug helps the cake rise evenly, while a wider mug gives more surface area for toppings.
Final Thoughts on Ingredients for Matilda Cake in Cup
This Matilda Cake in Cup recipe is incredibly versatile, allowing you to customize it exactly to your taste. Whether you prefer it extra chocolatey, gooey, or even vegan, adjusting the ingredients is simple. Once you’ve gathered everything, you’re just a few minutes away from enjoying a warm, decadent, and indulgent single-serve chocolate cake—straight from your microwave!
Step-by-Step Guide to Making Matilda Cake in Cup
Now that you have all your ingredients ready, it’s time to bring this Matilda Cake in Cup to life! This quick and easy microwave cake requires just a few simple steps, and in less than five minutes, you’ll have a warm, gooey, and chocolatey treat—just like the famous Matilda chocolate cake.
Follow this step-by-step guide to ensure a perfectly moist and rich cake in a cup every time.
Step 1 – Mixing the Dry Ingredients
The first step in making your Matilda Cake in Cup is to combine the dry ingredients directly in your mug. This helps distribute the cocoa powder and baking powder evenly, ensuring a smooth batter and a well-risen cake.
Instructions:
- Take a microwave-safe mug that’s at least 12 ounces (350 ml) in capacity to prevent overflow.
- Add 4 tablespoons of all-purpose flour into the mug.
- Stir in 2 tablespoons of granulated sugar for sweetness.
- Add 2 tablespoons of unsweetened cocoa powder for a deep, rich chocolate flavor.
- Mix in ¼ teaspoon of baking powder to help the cake rise.
- Add a small pinch of salt to balance the flavors.
- Use a fork or small whisk to mix everything well until evenly combined.
Pro Tip: Sifting the cocoa powder before adding it can help prevent lumps in the batter, giving you a smoother and fluffier cake.
Step 2 – Adding the Wet Ingredients
Now that your dry ingredients are well-mixed, it’s time to add the wet ingredients. These will create a smooth, chocolatey batter and keep the cake moist and tender.
Instructions:
- Pour in 3 tablespoons of milk (whole milk is best for a rich texture, but you can also use almond or oat milk for a dairy-free option).
- Add 2 tablespoons of melted butter for a rich and moist cake. If you prefer a lighter version, swap it for vegetable oil.
- Stir in ½ teaspoon of vanilla extract to enhance the flavor.
- Use your fork or whisk to mix everything together until no dry spots remain and the batter looks smooth and well-combined.
Pro Tip: Scrape the bottom and sides of the mug to make sure all the dry ingredients are incorporated. A well-mixed batter ensures an even rise and a perfect cake texture!
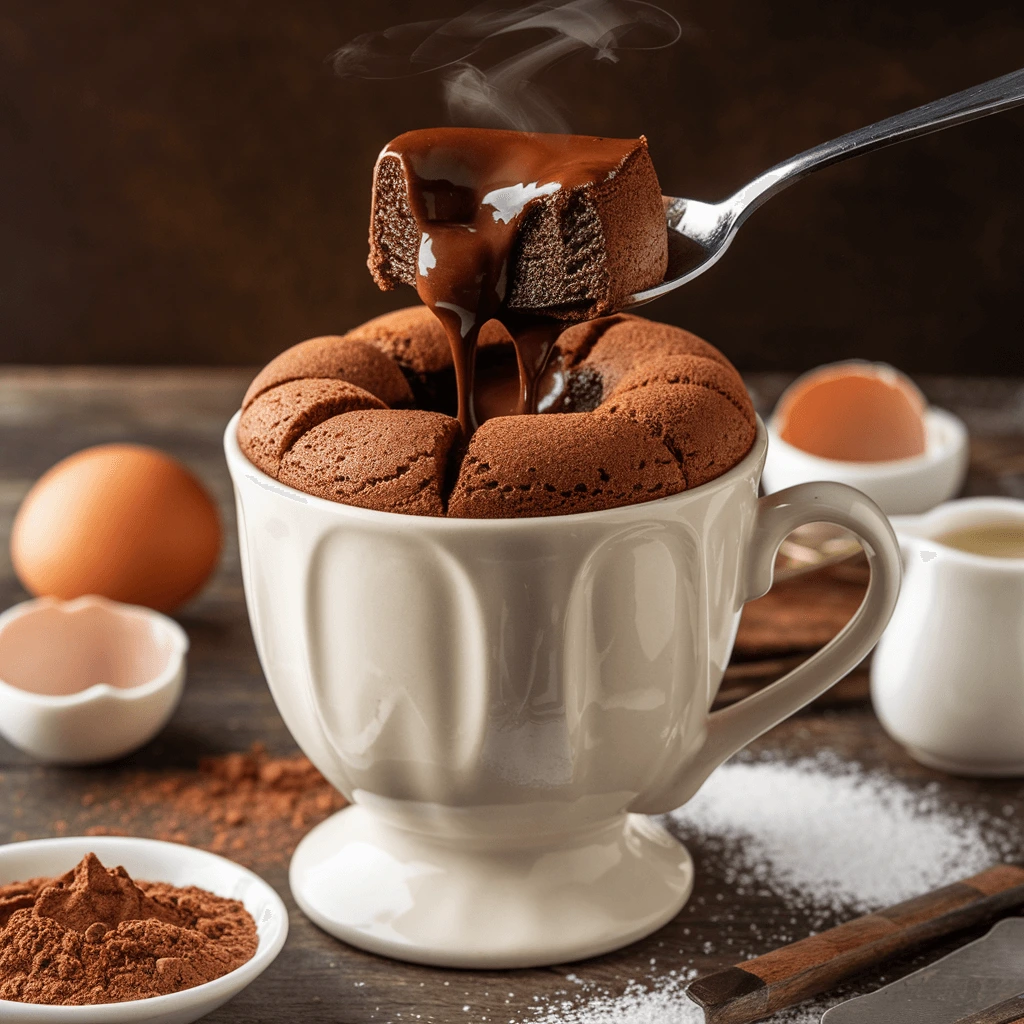
Step 3 – Microwaving the Cake
The magic of this Matilda Cake in Cup happens in the microwave. Since microwaves can vary in power, follow these steps carefully to avoid overcooking or undercooking your mug cake.
Instructions:
- Place your mug in the center of the microwave for even cooking.
- Microwave on high power (1000W) for 60 to 90 seconds.
- If your microwave is stronger (1200W+), start with 50 seconds and add more if needed.
- If your microwave is weaker (800W), cook for about 90 seconds.
- Watch the cake as it rises—it should puff up but not spill over.
- Once done, gently touch the top with your fingertip:
- If it feels firm but slightly springy, it’s ready!
- If it looks wet or undercooked, microwave it for another 5-10 seconds in short bursts.
Pro Tip: The cake will continue to cook slightly from residual heat, so don’t overcook it! A slightly gooey center is better than a dry cake.
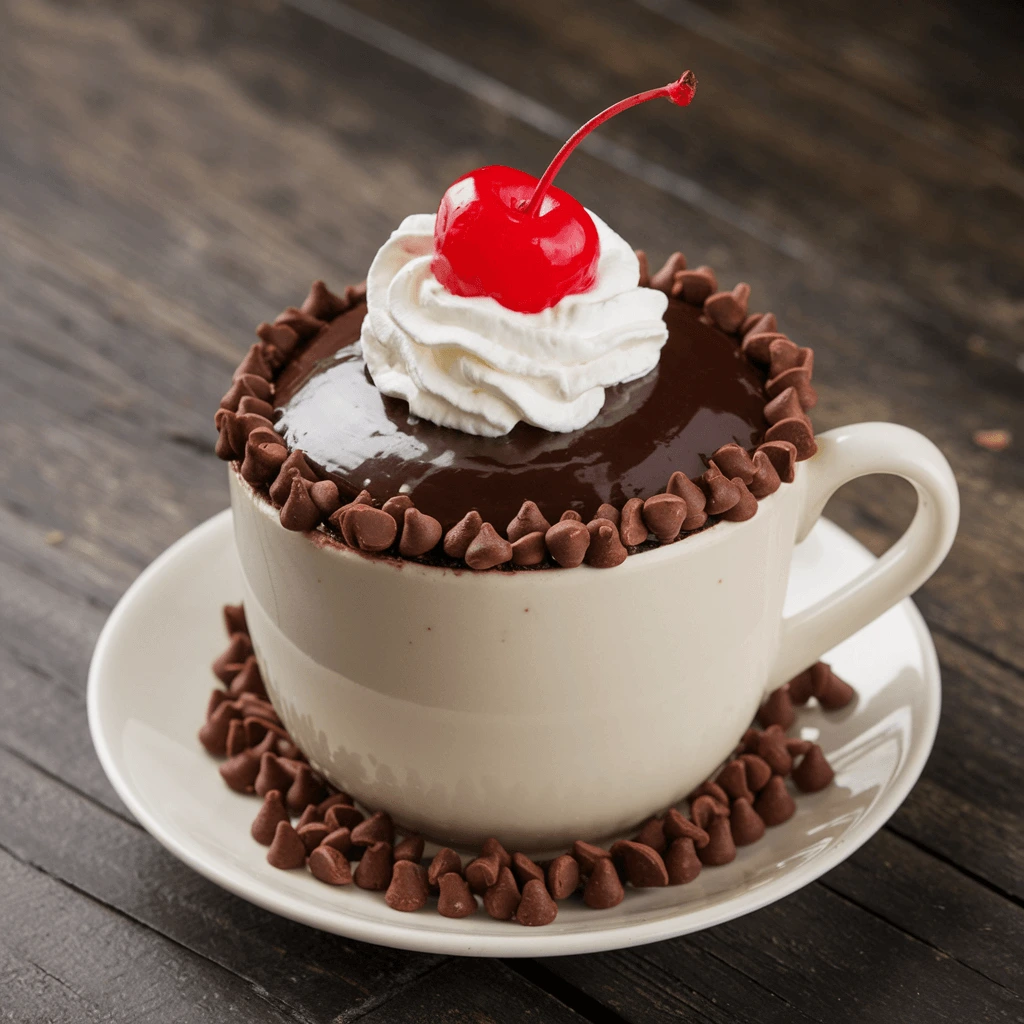
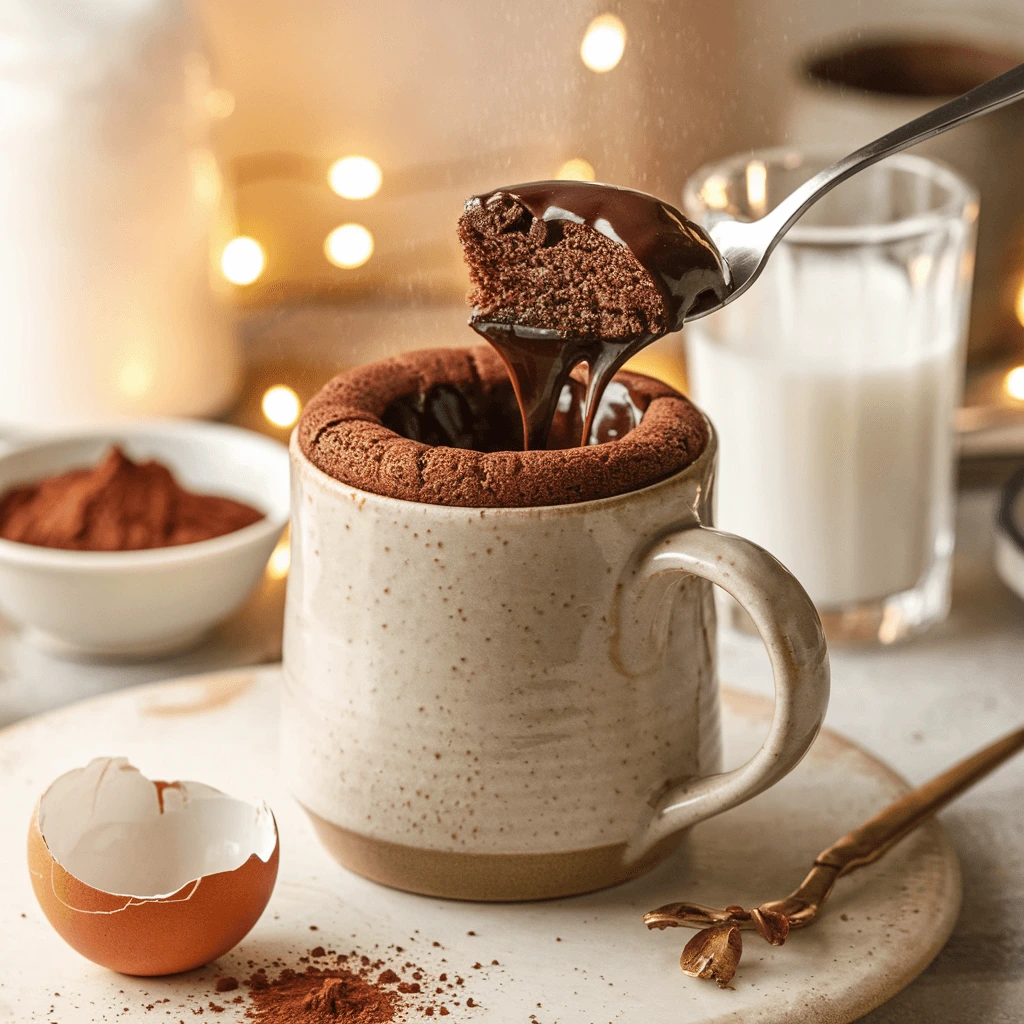
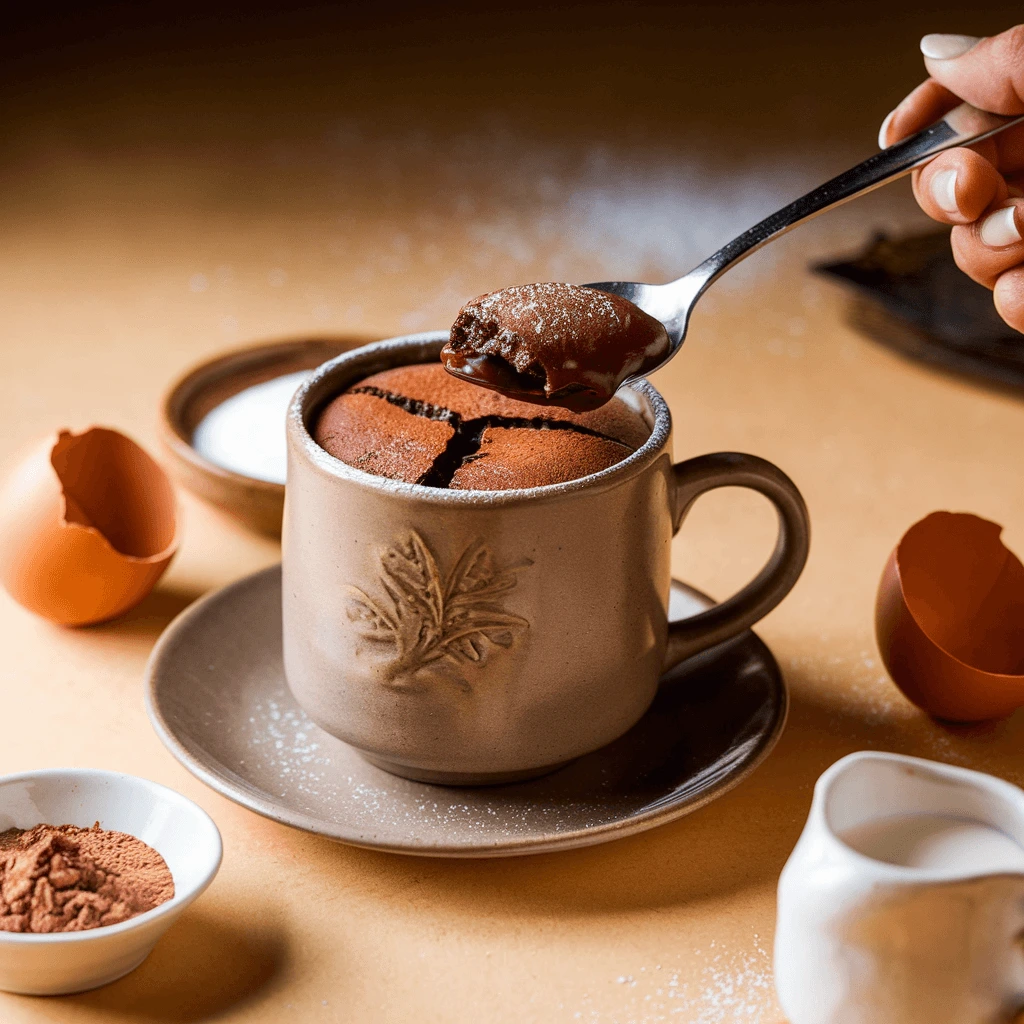
Step 4 – Toppings and Serving Suggestions
Now comes the fun part—customizing your Matilda Cake in Cup with delicious toppings!
Topping Ideas for Extra Indulgence:
- Chocolate Chips: Sprinkle on top while the cake is still warm for a melty, gooey bite.
- Nutella or Peanut Butter: Add a spoonful in the center before microwaving for a lava cake effect.
- Whipped Cream: A light, airy topping to balance the richness of the cake.
- Chocolate Sauce or Caramel Drizzle: For an extra layer of decadence.
- Sea Salt Flakes: Enhances the chocolate flavor with a gourmet touch.
- Vanilla Ice Cream: A perfect contrast to the warm cake—just like in fancy restaurants!
Pro Tip: Let the cake cool for 1-2 minutes before eating—this helps it set properly and prevents burns from the hot center.
Final Thoughts on Making Matilda Cake in Cup
This Matilda Cake in Cup recipe is the perfect quick-fix dessert for chocolate lovers. With simple ingredients, no oven required, and only a few minutes of prep, you can enjoy a rich, fudgy, and decadent cake anytime. Whether it’s for a late-night craving, a last-minute dessert, or a fun treat to share, this mug cake recipe is guaranteed to satisfy.
Now that you’ve mastered the step-by-step process, it’s time to grab a mug and make your own Matilda Cake in Cup—happy baking!
Tips and Variations for the Best Matilda Cake in Cup
A Matilda Cake in Cup is already an incredibly indulgent and easy-to-make dessert, but with a few expert tips and creative variations, you can take it to the next level. Whether you want a fudgier texture, a healthier alternative, or extra flavor twists, this section will guide you through the best ways to customize and perfect your mug cake experience.
How to Make the Matilda Cake in Cup Extra Fudgy
One of the defining features of a Matilda Cake in Cup is its moist, rich, and fudgy texture. If you want your mug cake to have even more gooeyness, try these tips:
- Add More Chocolate – Stir in chocolate chips, chopped dark chocolate, or a spoonful of Nutella into the batter before microwaving. This creates melty pockets of chocolate that enhance every bite.
- Use Hot Milk Instead of Cold – Warming up the milk before adding it to the batter helps dissolve the cocoa powder more evenly, leading to a smoother and richer cake.
- Increase the Fat Content – For a richer texture, replace butter with heavy cream or add an extra teaspoon of butter to intensify the creaminess.
- Undercook Slightly – Microwave the cake for slightly less time than recommended and let it rest for a minute. This keeps the center moist and slightly molten, similar to a lava cake.
- Drizzle Chocolate Sauce on Top – Pouring a thin layer of melted chocolate over the cake right after microwaving locks in moisture and enhances the chocolatey experience.
How to Make a Vegan Matilda Cake in Cup
For those who want a dairy-free and egg-free version of this delicious mug cake, it’s incredibly easy to adapt! Here’s how you can make a vegan Matilda Cake in Cup without sacrificing taste or texture:
- Replace Dairy Milk – Use almond milk, oat milk, or coconut milk instead of regular milk. These plant-based options work well and add a subtle flavor.
- Swap Butter for Oil – Coconut oil, avocado oil, or melted vegan butter will keep the cake just as moist and rich.
- Egg Substitute – While this recipe doesn’t require eggs, adding 1 tablespoon of applesauce, mashed banana, or a flaxseed egg (1 tbsp flaxseed meal + 2.5 tbsp water) will enhance the texture.
- Choose Vegan Chocolate – If adding chocolate chips, make sure they’re dairy-free or opt for dark chocolate chunks instead.
- Extra Flavor Boost – A drop of espresso or cinnamon will enhance the deep chocolate flavor without using dairy.
This vegan variation ensures everyone can enjoy a quick and delicious chocolate cake, no matter their dietary preferences!
How to Prevent a Dry Mug Cake
A common issue with microwave cakes is that they can sometimes turn out dry or rubbery. Follow these tips to ensure your Matilda Cake in Cup stays soft, moist, and decadent:
- Don’t Overcook It – The biggest mistake is microwaving the cake for too long. The cake will continue cooking from residual heat, so it’s best to stop when it’s slightly underdone in the center.
- Use the Right Mug Size – A mug that’s too small can cause the cake to overflow, while one that’s too large can lead to uneven cooking. A 12-ounce (350ml) microwave-safe mug works best.
- Mix the Batter Well – Any dry flour pockets in the batter can cause uneven baking. Stir thoroughly to ensure a smooth consistency.
- Cover While Microwaving – Placing a paper towel over the mug while microwaving traps moisture and prevents the cake from drying out.
- Add a Moisture Locking Ingredient – A teaspoon of yogurt, sour cream, or extra butter can help keep the cake ultra-moist.
Fun Twists on the Classic Matilda Cake in Cup Recipe
If you want to switch things up and experiment with different flavors, here are some exciting flavor variations to try:
1. Peanut Butter Chocolate Mug Cake
- Add 1 tablespoon of peanut butter to the batter or swirl it in before microwaving.
- Sprinkle chopped peanuts on top for extra crunch.
2. Caramel Lava Matilda Cake in Cup
- Add a soft caramel candy (like a Rolo) to the center before microwaving.
- Drizzle with salted caramel sauce after cooking.
3. Mocha Espresso Mug Cake
- Stir in ½ teaspoon of instant espresso powder for a deeper chocolate-coffee flavor.
- Top with whipped cream and a dusting of cocoa powder for a coffeehouse-style treat.
4. Oreo Cookie Mug Cake
- Crush 1-2 Oreo cookies and mix them into the batter.
- Garnish with Oreo crumbs and a dollop of whipped cream.
5. Mint Chocolate Chip Cake
- Add ¼ teaspoon of peppermint extract for a refreshing twist.
- Stir in mint chocolate chips or top with a crushed peppermint candy.
These creative variations allow you to customize your Matilda Cake in Cup and make each experience unique!
Final Thoughts on Making the Best Matilda Cake in Cup
This Matilda Cake in Cup recipe is already a quick, easy, and delicious treat, but with these tips and variations, you can make it even better. Whether you prefer a fudgier texture, a healthier alternative, or a new flavor twist, these simple adjustments will elevate your mug cake experience.
Next time you make this indulgent chocolate cake in a cup, try experimenting with different mix-ins, toppings, or techniques to find your perfect version. No matter how you customize it, one thing is certain—this Matilda Cake in Cup will always be a rich, chocolatey delight in just minutes! 🍫
Frequently Asked Questions (FAQs) About Matilda Cake in Cup
If you’re making Matilda Cake in Cup for the first time, you might have some questions about the process, ingredients, and ways to customize the recipe. Below are the most commonly asked questions along with helpful answers to ensure your mug cake turns out perfectly every time!
Can I Make Matilda Cake in Cup Without an Egg?
Yes! This Matilda Cake in Cup recipe doesn’t require eggs, making it even easier to prepare. The cake gets its structure and moisture from a combination of flour, cocoa powder, and butter (or oil), so it remains soft and fudgy without the need for eggs.
Best Egg Substitutes:
If you’d like to experiment with adding an egg alternative, here are some options:
- 1 tablespoon of unsweetened applesauce – Adds moisture and a slight natural sweetness.
- 1 tablespoon of mashed banana – Works well for binding and adds a hint of banana flavor.
- 1 tablespoon of yogurt or sour cream – Enhances creaminess and keeps the cake moist.
- 1 tablespoon of ground flaxseed mixed with 2.5 tablespoons of water – A great vegan-friendly alternative.
No matter which option you choose, the cake will still have a rich, delicious texture!
Can I Use a Different Flour Instead of All-Purpose Flour?
Yes! Although all-purpose flour is the most common and reliable choice for this Matilda Cake in Cup, there are several flour alternatives you can use:
- Gluten-Free Flour Blend – A 1:1 gluten-free baking flour works best for those avoiding gluten.
- Almond Flour – Adds a slightly nutty taste and makes the cake a bit denser.
- Coconut Flour – Absorbs more moisture, so you may need to add a little extra milk to balance the batter.
- Whole Wheat Flour – A healthier option, but it may result in a slightly denser cake.
Whichever flour you choose, make sure to adjust the liquid ingredients slightly to achieve the right consistency. The batter should be smooth and pourable but not too runny.
Why Did My Matilda Cake in Cup Turn Out Dry or Rubbery?
If your mug cake turned out dry or rubbery, it’s likely due to one of the following reasons:
- Overcooking – The most common mistake is microwaving the cake for too long. The cake will continue to cook slightly after you remove it from the microwave, so stop cooking as soon as the top looks set.
- Too Little Liquid – Not adding enough milk or butter can make the cake dry. Ensure you’re using the exact measurements for the best results.
- Using the Wrong Mug – A mug that is too small may cause the batter to heat unevenly. Always use a 12-ounce (350ml) microwave-safe mug.
- Not Mixing Well – If the ingredients aren’t properly combined, some areas might overcook while others stay undercooked. Stir until you have a smooth, lump-free batter.
Quick Fix: If your cake turns out a bit dry, try drizzling it with chocolate sauce, caramel, or a spoonful of milk right after microwaving to add back some moisture.
Can I Double the Recipe to Make More Than One Serving?
Yes, you can double the recipe, but it’s best to divide the batter into two separate mugs rather than making one large cake in a single mug. Here’s why:
- A larger amount of batter in one mug may not cook evenly. The center may remain undercooked while the edges overcook.
- Making two separate servings ensures each cake rises properly and has the perfect texture.
- If doubling the recipe in one mug, increase the cooking time slightly, but check every 10-15 seconds to prevent overcooking.
If you’re making multiple servings, you can microwave one mug at a time or use an oven-safe ramekin and bake at 350°F (175°C) for 10-12 minutes instead.
Can I Make Matilda Cake in Cup Without Cocoa Powder?
Yes! If you don’t have cocoa powder, you can still make a delicious single-serve cake by substituting it with other ingredients that maintain the cake’s richness. Here are a few options:
- Melted Chocolate (1 tablespoon) – Gives a deeper chocolate flavor.
- Chocolate Protein Powder (1 tablespoon) – A great alternative for a healthier version.
- Carob Powder (2 tablespoons) – A caffeine-free chocolate substitute.
If you want a non-chocolate version, simply omit the cocoa powder and add a dash of cinnamon and vanilla extract for a flavorful vanilla mug cake.
How Do I Store Leftover Matilda Cake in Cup?
This mug cake is best enjoyed fresh, but if you need to store leftovers, follow these steps:
- Let it cool completely before storing.
- Cover the mug with plastic wrap or transfer the cake to an airtight container.
- Refrigerate for up to 24 hours.
- To reheat, microwave for 10-15 seconds and add a little milk if needed to restore moisture.
However, since this is a single-serve dessert, it’s best to make it fresh each time for the best texture and flavor.
Can I Add Toppings to My Matilda Cake in Cup?
Absolutely! The best thing about Matilda Cake in Cup is how customizable it is. Here are some delicious topping ideas:
- Chocolate chips or chunks – Melted chocolate makes every bite extra fudgy.
- Nutella or peanut butter – Swirl a spoonful into the batter before microwaving.
- Caramel drizzle – Adds a sweet and buttery caramel flavor.
- Whipped cream or ice cream – Perfect for balancing the rich chocolate taste.
- Crushed nuts or Oreos – Adds texture and crunch.
Feel free to experiment with different toppings to make your Matilda Cake in Cup uniquely yours!
Final Thoughts on Matilda Cake in Cup FAQs
This Matilda Cake in Cup recipe is incredibly versatile, easy, and perfect for any occasion. Whether you need a quick chocolate fix, a vegan-friendly option, or a healthier alternative, this mug cake can be customized to fit your cravings.
If you have more questions about making the best single-serve chocolate cake, don’t hesitate to experiment and find your perfect version. Now that you have all the answers, it’s time to grab your mug and start baking!
1 thought on “How to Make Matilda Cake in a Cup – Quick & Simple Recipe”