
If you’re a chocolate lover, get ready to experience the ultimate decadent, gooey treat—the Matilda Chocolate Cake! Inspired by the famous scene in Matilda, where Bruce Bogtrotter devours a rich, fudgy chocolate cake, this recipe is everything a dessert should be: moist, indulgent, and deeply chocolaty.
Moreover, this homemade chocolate cake is surprisingly easy to make, using simple ingredients like cocoa powder, butter, sugar, eggs, and chocolate ganache. With every bite, you’ll enjoy a velvety texture and intense chocolate flavor that will keep you coming back for more.
In this guide, I’ll walk you through a step-by-step process to create this classic, gooey chocolate cake, ensuring it turns out perfectly moist and irresistibly rich. Whether you’re baking it for a special occasion or simply treating yourself, this recipe is guaranteed to impress.
So, let’s dive in and make the best-ever Matilda Chocolate Cake—a dessert that’s as legendary as the movie itself!
The Story Behind the Famous Matilda Chocolate Cake
The Matilda Chocolate Cake isn’t just any chocolate cake—it’s a legendary dessert that became famous thanks to the beloved 1996 film Matilda, based on Roald Dahl’s classic novel. This cake holds a special place in pop culture, sparking nostalgia for fans who grew up watching the unforgettable Bruce Bogtrotter scene. But what makes this cake so special, and why has it remained an iconic treat for chocolate lovers worldwide? Let’s dive into its delicious backstory.
Bruce Bogtrotter’s Iconic Scene: A Cake Lover’s Dream (or Nightmare?)
One of the most memorable moments in Matilda is when young Bruce Bogtrotter, a student at Crunchem Hall, is caught stealing a slice of the school’s massive chocolate cake. As punishment, the cruel headmistress, Miss Trunchbull, forces him to eat an entire oversized chocolate cake in front of the whole school.
At first, the scene feels like a nightmare—an overwhelming challenge that seems impossible to complete. However, Bruce’s determination, coupled with the cheering of his classmates, turns this punishment into a victory of resilience and sweet indulgence. As he devours the thick, fudgy, and gooey cake, the audience can’t help but crave a slice of their own.
Why This Cake is So Special
The Matilda Chocolate Cake is not just a visual masterpiece in the movie—it embodies everything we love about a perfect homemade chocolate cake. It’s dense, moist, and rich, covered in a smooth layer of chocolate ganache that drips down the sides, making it irresistibly decadent.
Moreover, the scene itself represents strength and triumph, as Bruce’s determination inspires others to stand up against injustice (even if it’s just through cake!). This is one reason why this particular chocolate cake has remained a favorite among fans, with many bakers attempting to recreate the exact fudgy texture and deep chocolate flavor seen in the movie.
Inspired by Roald Dahl’s Love for Indulgence
Roald Dahl, the author of Matilda, was known for his love of delicious, whimsical food descriptions in his books. From chocolate rivers in Charlie and the Chocolate Factory to the delightful treats in The Twits, food plays an important role in creating magical moments within his stories. The Matilda Chocolate Cake is no exception—it represents pure indulgence, childhood rebellion, and the simple joy of chocolate.
A Cake Worth Recreating
Whether you’re a fan of the Matilda movie, Roald Dahl’s book, or simply a lover of rich chocolate desserts, this cake is a must-try recipe. The combination of moist chocolate layers, deep cocoa flavor, and creamy ganache makes it a true showstopper.
Now that we know the story behind this legendary chocolate cake, let’s get to the fun part—baking it from scratch!
Ingredients for the Best Matilda Chocolate Cake
Creating the perfect Matilda Chocolate Cake requires the right balance of rich, high-quality ingredients that give it its signature moist, fudgy, and decadent texture. The key to achieving that deep chocolate flavor and silky smooth ganache is using the best components, ensuring every bite is indulgent and satisfying.
In this section, we’ll break down the essential dry ingredients, wet ingredients, and the luxurious chocolate ganache, as well as some optional add-ins to elevate the flavor even further.
1. Dry Ingredients: The Foundation of a Rich Chocolate Cake
To achieve a dense yet fluffy texture, the right combination of dry ingredients is crucial. These provide structure, depth of flavor, and a perfect crumb.
- All-Purpose Flour (2 cups) – The base of the cake, ensuring a soft but sturdy texture. If you want a lighter cake, you can substitute part of it with cake flour.
- Unsweetened Cocoa Powder (¾ cup) – For a deep, rich chocolate flavor, use Dutch-process cocoa powder, which has a smoother, less acidic taste than regular cocoa powder.
- Granulated Sugar (2 cups) – Provides sweetness and helps retain moisture. You can use a mix of brown sugar and white sugar for an extra fudgy texture.
- Baking Soda (1½ teaspoons) & Baking Powder (1 teaspoon) – These leavening agents help the cake rise and create a light, airy crumb.
- Salt (½ teaspoon) – Enhances the chocolate flavor and balances the sweetness.
2. Wet Ingredients: The Secret to Moist, Gooey Chocolate Cake
The wet ingredients in this recipe add moisture, richness, and ensure the cake stays soft and tender. The right combination prevents a dry texture and enhances the overall decadence of the cake.
- Eggs (2 large) – Bind the ingredients together and add structure and richness. For an extra moist cake, use room-temperature eggs.
- Buttermilk (1 cup) – The acidity in buttermilk reacts with the baking soda, making the cake incredibly tender. If you don’t have buttermilk, you can substitute it with 1 cup of milk + 1 tablespoon of vinegar or lemon juice.
- Vegetable Oil (½ cup) – Oil keeps the cake extra moist and prevents it from drying out. You can also use melted butter for a richer flavor, but oil creates a more tender crumb.
- Vanilla Extract (2 teaspoons) – Enhances the chocolate flavor and adds a subtle sweet, aromatic depth.
- Boiling Water or Hot Coffee (1 cup) – This is a game-changer for deep chocolate flavor! The heat helps bloom the cocoa powder, intensifying its richness. Coffee won’t make the cake taste like coffee—it simply enhances the chocolate notes.
3. The Decadent Chocolate Ganache: The Icing on the Cake
A Matilda Chocolate Cake wouldn’t be complete without its signature glossy, silky-smooth ganache, which coats the cake in a rich, velvety layer of chocolate indulgence.
- Dark Chocolate (8 oz, finely chopped) – Use high-quality semi-sweet or dark chocolate for a more luxurious, rich ganache. Avoid chocolate chips, as they contain stabilizers that prevent smooth melting.
- Heavy Cream (1 cup) – Creates the perfect creamy, glossy texture when combined with melted chocolate.
- Unsalted Butter (2 tablespoons, optional) – Adds extra silkiness and richness to the ganache, making it even more indulgent.
- Pinch of Salt – Enhances the chocolate flavor and balances the sweetness.
How to Make the Ganache:
- Heat the heavy cream until it just begins to simmer (do not boil).
- Pour it over the chopped chocolate and let it sit for a minute.
- Stir gently until the chocolate melts completely, forming a smooth, shiny ganache.
- Let it cool slightly before pouring over the cake.
4. Optional Add-Ins to Elevate the Flavor
Want to take your Matilda Chocolate Cake to the next level? Try adding some of these delicious mix-ins and variations:
- Espresso Powder (1 teaspoon) – Intensifies the chocolate flavor without making the cake taste like coffee.
- Chocolate Chips (½ cup, folded into the batter) – Adds extra gooeyness with melty pockets of chocolate in every bite.
- Salted Caramel Drizzle – A sweet and salty contrast that makes the cake even more irresistible.
- Chopped Nuts (¼ cup) – Adds a slight crunch and pairs well with the rich chocolate flavor.
- Whipped Cream Topping – Lightens the overall texture when served alongside the cake.
Final Thoughts on Choosing the Best Ingredients
The success of your Matilda Chocolate Cake lies in using high-quality ingredients and the right proportions. Dutch-process cocoa, buttermilk, and hot coffee are all secret weapons that make this cake incredibly moist, rich, and flavorful.
Now that we’ve gathered all the necessary ingredients, it’s time to put them to use! Next, let’s dive into the step-by-step instructions to bake the ultimate fudgy, gooey, and decadent Matilda Chocolate Cake.
Step-by-Step Instructions to Bake the Perfect Matilda Chocolate Cake
Baking the Matilda Chocolate Cake is a rewarding process that transforms simple ingredients into a decadent, fudgy, and irresistibly moist dessert. To ensure success, follow these detailed step-by-step instructions carefully. Each stage plays a vital role in creating the rich chocolate flavor and gooey texture that makes this cake legendary.
Step 1: Preparing the Cake Batter
Before diving into the mixing process, it’s essential to set up your workspace properly. This ensures a smooth baking experience and prevents any last-minute mistakes.
1. Preheat Your Oven & Prepare Your Baking Pan
- Preheat your oven to 350°F (175°C). This ensures even baking and helps the cake develop the perfect rise.
- Grease a 9-inch round cake pan with butter or non-stick spray. For extra assurance, line the bottom with parchment paper to prevent sticking.
2. Mix the Dry Ingredients
- In a large mixing bowl, sift together:
- 2 cups all-purpose flour
- ¾ cup unsweetened cocoa powder (preferably Dutch-process)
- 2 cups granulated sugar
- 1½ teaspoons baking soda
- 1 teaspoon baking powder
- ½ teaspoon salt
- Why sift? Sifting prevents lumps and ensures the ingredients are evenly distributed, leading to a smooth batter.
3. Combine the Wet Ingredients
- In a separate medium bowl, whisk together:
- 2 large eggs (room temperature)
- 1 cup buttermilk (for extra moisture and tenderness)
- ½ cup vegetable oil (keeps the cake super moist!)
- 2 teaspoons vanilla extract (enhances the chocolate flavor)
- Mix until fully combined.
4. Combine Wet & Dry Ingredients
- Gradually add the wet mixture into the dry ingredients, stirring gently with a whisk or a stand mixer on low speed.
- The batter will be thick at this stage—don’t worry, it will loosen up in the next step!
5. Add Boiling Water or Hot Coffee (Game-Changer!)
- Slowly pour 1 cup of boiling water or hot coffee into the batter while mixing continuously.
- Why? The heat blooms the cocoa powder, intensifying the chocolate flavor and creating a smooth, lump-free batter.
- The batter will be thin—this is normal! It ensures a moist and tender cake.
Step 2: Baking the Cake to Perfection
Now that the batter is ready, it’s time to bake the cake!
1. Pour the Batter into the Pan
- Carefully pour the batter into the prepared cake pan.
- Tap the pan gently on the counter to remove any air bubbles.
2. Bake in the Preheated Oven
- Place the pan in the center of the oven and bake for 30-35 minutes.
- The cake is done when a toothpick inserted in the center comes out with a few moist crumbs (not wet batter!).
- Pro Tip: If the top is browning too quickly, lightly tent the cake with aluminum foil halfway through baking.
3. Let the Cake Cool Completely
- Remove the cake from the oven and let it cool in the pan for 10 minutes.
- Then, transfer it to a wire rack to cool completely before adding ganache.
- Why? A warm cake will cause the ganache to melt unevenly, so patience is key!
Step 3: Making the Silky Chocolate Ganache
The rich, glossy chocolate ganache is what makes this cake truly indulgent. It adds a smooth, velvety layer of chocolate that enhances every bite.
1. Heat the Heavy Cream
- In a small saucepan, heat 1 cup of heavy cream over medium heat until it just starts to simmer (do not boil).
- Alternatively, you can microwave the cream in a heatproof bowl for 1-2 minutes until hot.
2. Pour Over the Chocolate
- Place 8 oz of finely chopped dark chocolate in a bowl.
- Pour the hot cream over the chocolate and let it sit for 1-2 minutes.
3. Stir Until Smooth
- Gently whisk the mixture until the chocolate melts completely, creating a silky, glossy ganache.
- If desired, add 2 tablespoons of butter for extra shine and richness.
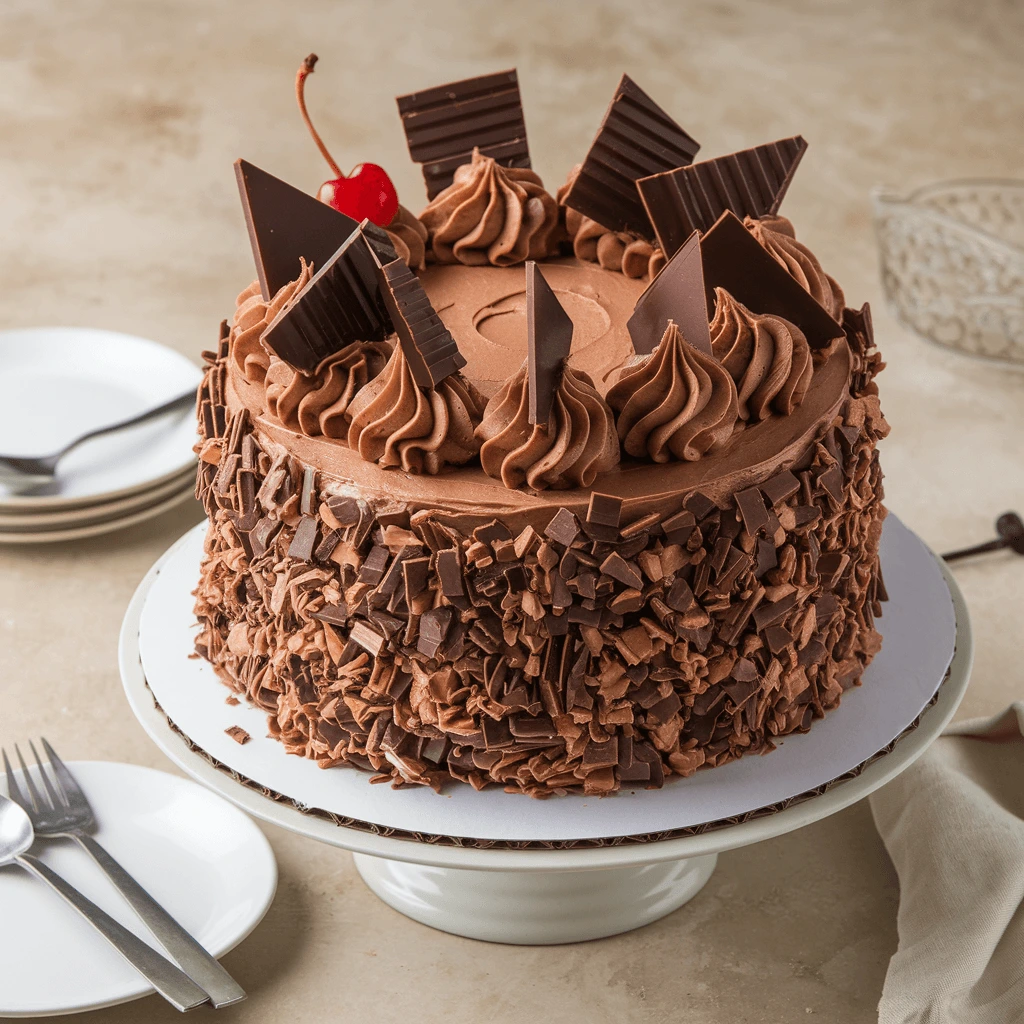
Step 4: Assembling & Decorating the Cake
Now comes the fun part—putting it all together!
1. Pour the Ganache Over the Cake
- Place the cooled cake on a serving plate or cake stand.
- Slowly pour the warm ganache over the top, letting it drip naturally down the sides.
- Use an offset spatula to spread the ganache evenly.
2. Let It Set
- Allow the ganache to set at room temperature for 15-20 minutes or refrigerate for a firmer finish.
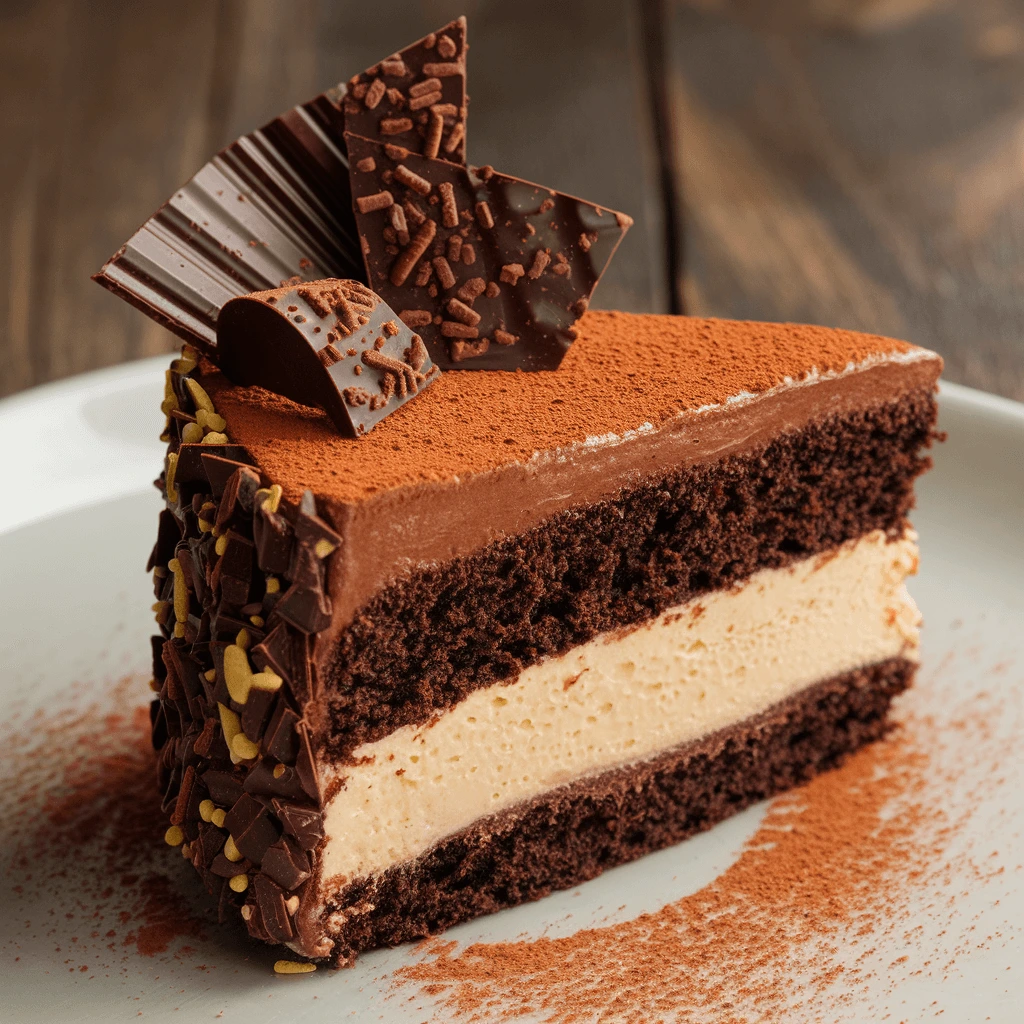
3. Add Optional Decorations
For extra texture and visual appeal, try:
- Chocolate shavings or curls for a gourmet look.
- A dusting of cocoa powder or powdered sugar for elegance.
- Whipped cream and fresh berries for contrast.
Step 5: Slicing & Serving the Ultimate Matilda Chocolate Cake
Your Matilda Chocolate Cake is now ready to enjoy! Follow these serving tips to make the most of this gooey, chocolaty masterpiece.
1. Use a Warm Knife for Clean Slices
- Dip a sharp knife in hot water, wipe it dry, and cut clean slices without dragging the ganache.
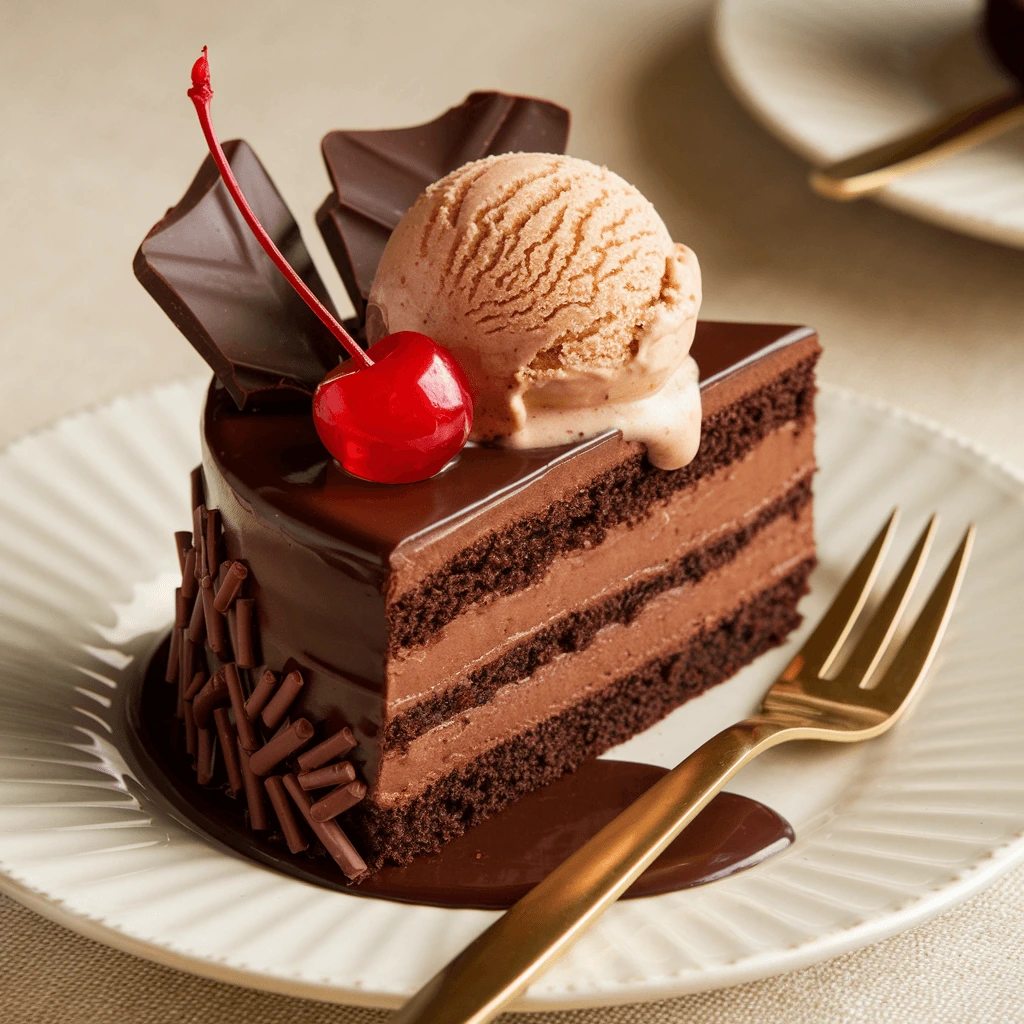
2. Serve with Complementary Flavors
- A scoop of vanilla ice cream balances the richness.
- A glass of cold milk pairs perfectly for a nostalgic treat.
3. Storing Leftovers
- Store in an airtight container at room temperature for 2 days.
- Refrigerate for up to a week, but allow it to come to room temp before serving for the best texture.
Final Thoughts: The Perfect Chocolate Cake Every Time
Baking the perfect Matilda Chocolate Cake is all about quality ingredients, proper technique, and patience. By following these steps, you’ll create a rich, moist, and fudgy dessert that’s sure to impress.
Now that you’ve mastered the ultimate chocolate cake, what’s next? Why not try making Matilda-inspired chocolate cupcakes or experimenting with flavored ganache variations? Let us know in the comments how your cake turned out!
Tips for a Rich, Moist, and Fudgy Chocolate Cake
A truly indulgent Matilda Chocolate Cake should be rich, moist, and fudgy, with a deep chocolate flavor and a soft, melt-in-your-mouth texture. Achieving this requires more than just following a recipe—it’s about using the right ingredients, mixing techniques, and baking methods to get the perfect results.
The following expert tips will help ensure your chocolate cake stays ultra-moist, full of flavor, and has that irresistibly fudgy consistency that makes it truly unforgettable.
1. Choose the Right Cocoa Powder for a Deep Chocolate Flavor
The cocoa powder you use directly affects the flavor and texture of the cake. Different types of cocoa powder behave differently in baking, so it’s important to select the right one.
- Dutch-Processed Cocoa Powder: This cocoa powder is treated with an alkalizing agent to neutralize its acidity, giving it a mild, smooth chocolate flavor and a darker color. It works best in recipes that use baking powder as a leavening agent.
- Natural Cocoa Powder: This cocoa is more acidic and has a stronger, slightly bitter chocolate flavor. It works well with baking soda, which reacts with its acidity to help the cake rise.
For a deep, well-rounded chocolate flavor, consider using a blend of both Dutch-processed and natural cocoa powders. This combination enhances the cake’s complexity while maintaining a rich, fudgy texture.
2. Measure Ingredients Accurately to Maintain the Right Texture
Baking is a science, and precise measurements are essential for achieving the perfect cake consistency. Small errors, such as using too much flour or too little liquid, can result in a dry cake.
- Use a kitchen scale: Weighing ingredients ensures accuracy, especially for flour and cocoa powder. If measuring by cups, always spoon and level dry ingredients instead of scooping, which can lead to packing and excess flour.
- Sift dry ingredients: Sifting the flour and cocoa powder helps aerate them, preventing clumps and ensuring an even distribution in the batter.
Accurate measuring keeps the cake’s structure balanced and prevents it from becoming too dense or dry.
3. Avoid Overmixing to Keep the Cake Light and Tender
Overmixing the batter can lead to excess gluten development, making the cake dense and chewy instead of light and tender.
- Mix just until the ingredients are combined—a few lumps are fine.
- If using a stand mixer, keep it on low speed and stop as soon as the wet and dry ingredients come together.
The goal is to create a smooth, well-incorporated batter while maintaining an airy texture that bakes into a moist and soft cake.
4. Add Boiling Water or Hot Coffee for Maximum Moisture
One of the secrets to a super moist, fudgy chocolate cake is adding boiling water or hot coffee to the batter.
- Boiling Water: Helps dissolve sugar and bloom the cocoa powder, releasing deeper chocolate flavors.
- Hot Coffee: Enhances the richness of the chocolate without making the cake taste like coffee. The slight bitterness balances the sweetness, intensifying the chocolate depth.
Pour the hot liquid gradually while mixing on low speed to ensure even incorporation without scrambling the eggs.
5. Use Buttermilk for an Extra Moist and Tender Cake
Buttermilk is a key ingredient in making the cake tender, soft, and slightly tangy, which enhances the chocolate flavor. The acidity in buttermilk helps break down gluten, ensuring a melt-in-your-mouth texture.
If buttermilk isn’t available, a simple substitute can be made:
- Mix 1 cup of whole milk with 1 tablespoon of vinegar or lemon juice, then let it sit for five minutes before using.
Buttermilk also reacts with baking soda, giving the cake a lighter structure while keeping it moist and fluffy.
6. Use a Combination of Oil and Butter for the Best Texture
The choice of fat affects both the moisture content and the richness of flavor.
- Vegetable Oil: Ensures a super moist and soft texture that lasts longer, even after refrigeration.
- Butter: Adds richness and depth of flavor, but on its own, it can sometimes dry out the cake faster.
For the best of both worlds, use a combination of oil and butter—the oil maintains moisture, while butter enhances flavor. A good ratio is ½ cup vegetable oil + ¼ cup melted butter.
7. Bake at the Right Temperature and Time
Baking at the correct temperature is crucial to achieving a cake that is fully cooked yet retains its moist, fudgy consistency.
- Preheat the oven to 350°F (175°C) before baking to ensure even heat distribution.
- Check for doneness at 30 minutes by inserting a toothpick into the center—if it comes out with a few moist crumbs (but not wet batter), the cake is ready.
- Avoid overbaking, as even a few extra minutes can result in a dry cake. The cake will continue cooking slightly as it cools, so removing it at the right moment is essential.
If the edges pull away from the pan too quickly, or the top cracks excessively, the cake may be overbaked.
8. Let the Cake Cool Properly Before Adding Ganache
Cooling is an essential step to prevent the ganache from melting too much and soaking into the cake unevenly.
- Allow the cake to cool in the pan for 10-15 minutes before transferring it to a wire rack.
- Let it cool completely for about one hour before adding the ganache.
For a thicker, truffle-like texture, refrigerate the cake for 30 minutes before slicing—this helps set the ganache and makes the slices clean and sharp.
9. Enhance the Flavor with Espresso Powder or Dark Chocolate
For a deeper chocolate profile, small flavor-enhancing ingredients can make a significant difference.
- Espresso Powder (1 teaspoon) enhances chocolate richness without adding a coffee taste.
- Dark Chocolate Chunks folded into the batter create gooey pockets of chocolate throughout the cake.
- A pinch of sea salt balances the sweetness and adds depth to the chocolate flavor.
Dusting chocolate chips in flour before adding them to the batter prevents them from sinking to the bottom.
10. Store the Cake Properly to Retain Freshness
How the cake is stored affects its moisture retention and overall texture.
- At room temperature: Keep in an airtight container for up to two days.
- In the refrigerator: Store in an airtight container for up to one week, bringing it to room temperature before serving.
- In the freezer: Wrap slices tightly in plastic wrap and store for up to three months.
To refresh a refrigerated cake, microwave a slice for 10-15 seconds for a warm, gooey texture similar to freshly baked cake.
Final Thoughts on Achieving the Perfect Chocolate Cake
A moist, fudgy Matilda Chocolate Cake requires the right ingredients and techniques. Choosing quality cocoa powder, using buttermilk and oil, avoiding overmixing, baking at the correct temperature, and cooling properly are all key steps to ensuring a decadent result.
By following these expert tips, you’ll create a rich, gooey, and flavorful chocolate cake that will impress every chocolate lover. Whether served plain, with a dusting of cocoa, or topped with a silky chocolate ganache, this cake is guaranteed to be a showstopper.
Would you like to move on to the Serving and Storing Instructions, or do you need any refinements here?
Serving, Storing, and Variations
The Matilda Chocolate Cake is best enjoyed fresh, but knowing the right ways to serve, store, and customize it ensures that you can savor its rich, fudgy goodness for days. Whether you’re looking for the perfect way to present it, need tips on keeping it moist, or want to try creative variations, this section will guide you through the best practices.
1. Serving the Ultimate Matilda Chocolate Cake
A well-made chocolate cake deserves the perfect presentation and pairing. Here’s how to serve it for the best flavor and texture.
Best Ways to Serve the Cake
- Room Temperature for the Best Texture: Let the cake sit at room temperature for 15-20 minutes after refrigeration to bring back its soft and fudgy consistency.
- Slicing Tip for Clean Cuts: Use a sharp knife dipped in warm water, wiping it clean between each slice. This ensures smooth, clean cuts without dragging the ganache.
- Extra Ganache Drizzle: If you want an even more indulgent experience, warm some extra ganache and drizzle it over individual slices before serving.
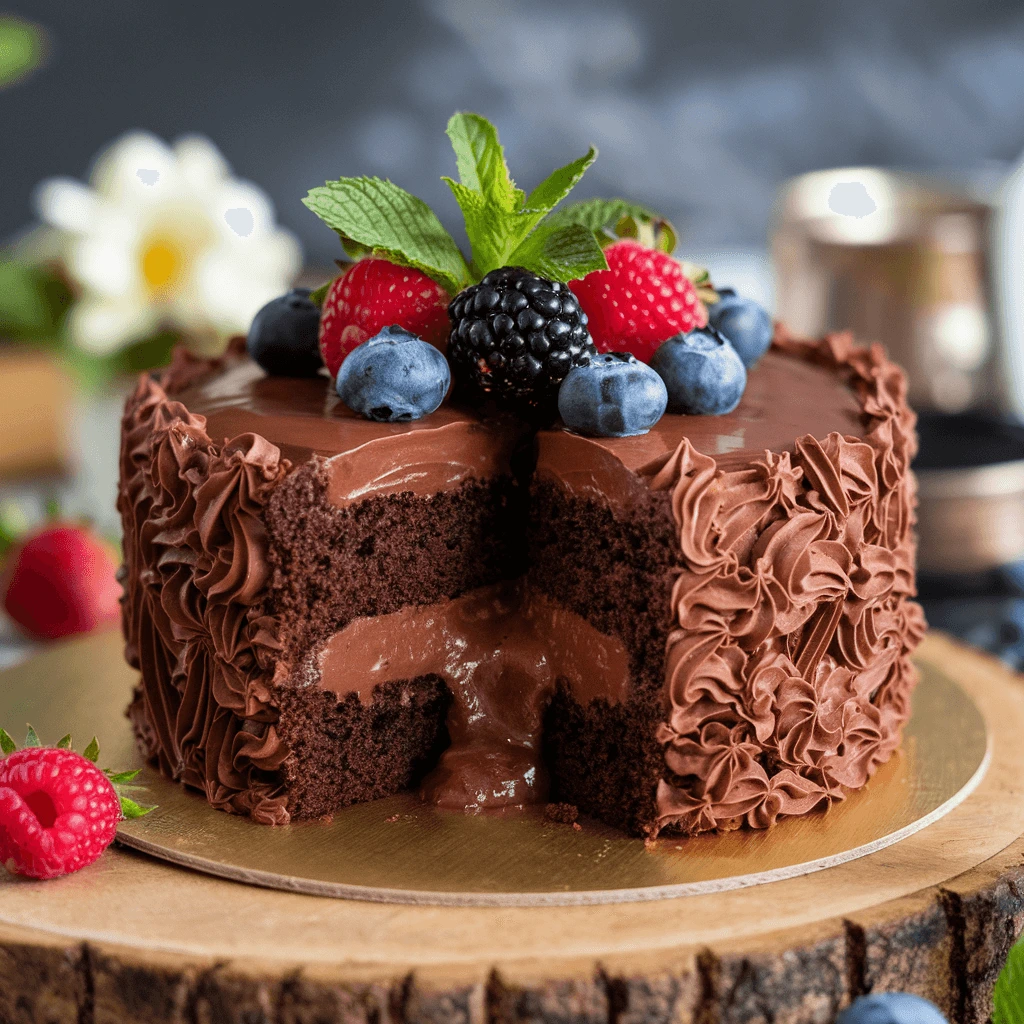
Perfect Pairings for Chocolate Cake
The richness of this cake pairs beautifully with a variety of flavors:
- Vanilla Ice Cream – A creamy contrast to the deep chocolate flavor.
- Fresh Berries – Strawberries, raspberries, or blueberries provide a refreshing tartness that balances the sweetness.
- Whipped Cream – Light and airy, whipped cream adds a smooth contrast to the dense cake.
- Espresso or Coffee – A strong, bitter espresso enhances the chocolate flavor, making each bite even more decadent.
- Caramel Sauce or Sea Salt Flakes – For a sweet-and-salty combination that elevates the taste profile.
For a special occasion, consider serving it with chocolate shavings, edible gold dust, or chocolate curls to enhance its visual appeal.
2. Storing the Cake for Maximum Freshness
To keep the Matilda Chocolate Cake moist and flavorful, proper storage is essential. This cake contains ganache, so the method of storage will depend on how long you plan to keep it.
Short-Term Storage (1-2 Days at Room Temperature)
- If the cake will be eaten within 48 hours, it can be stored at room temperature in an airtight container.
- Keep it in a cool, dry place, away from direct sunlight and heat.
- For extra freshness, place a piece of parchment paper between slices to prevent them from sticking together.
Refrigerating the Cake (Up to 1 Week)
- If storing for longer than two days, place the cake in an airtight container or wrap it tightly with plastic wrap.
- Refrigerate for up to one week.
- Before serving, let the cake sit at room temperature for about 15-30 minutes to soften the ganache and enhance the flavors.
Freezing the Cake (Up to 3 Months)
Freezing is the best way to preserve the cake for long-term storage without losing its moist texture.
- For a Whole Cake: Wrap the entire cake tightly in plastic wrap, then in aluminum foil to prevent freezer burn.
- For Slices: Wrap individual slices in plastic wrap, then store them in an airtight freezer-safe container.
- Thawing Instructions: When ready to serve, transfer the cake from the freezer to the refrigerator and let it thaw overnight. Bring it to room temperature before serving for the best texture.
To enjoy a warm, fudgy slice, microwave an individual piece for 10-15 seconds before serving.
3. Creative Variations of Matilda Chocolate Cake
For those who love experimenting in the kitchen, there are plenty of ways to customize the Matilda Chocolate Cake while keeping its classic fudgy and moist texture.
1. Gluten-Free Matilda Chocolate Cake
- Replace all-purpose flour with gluten-free 1:1 baking flour.
- Add an extra egg or 1 tablespoon of cornstarch to maintain structure and moisture.
- Ensure that cocoa powder and baking powder are labeled gluten-free.
2. Double Chocolate Cake (Extra Fudgy Version)
- Fold ½ cup of chocolate chips into the batter before baking.
- Replace part of the cocoa powder with melted dark chocolate for an even deeper chocolate flavor.
- Add a layer of chocolate mousse or whipped ganache between the cake layers.
3. Salted Caramel Chocolate Cake
- Swirl homemade salted caramel sauce into the ganache for a sweet and salty twist.
- Sprinkle flaky sea salt over the top before serving.
- Add a thin layer of caramel buttercream frosting between layers for extra indulgence.
4. Peanut Butter Chocolate Cake
- Add ½ cup of creamy peanut butter to the batter for a chocolate-peanut butter flavor.
- Make a peanut butter ganache by mixing melted peanut butter with cream and drizzling it over the cake.
- Top with chopped peanuts or Reese’s peanut butter cups for decoration.
5. Vegan Matilda Chocolate Cake
- Replace eggs with flaxseed eggs (1 tablespoon ground flaxseed + 3 tablespoons water per egg).
- Use coconut milk or almond milk with vinegar instead of buttermilk.
- Swap butter for coconut oil or vegetable oil and use dairy-free chocolate for the ganache.
6. Mocha Chocolate Cake
- Replace hot water with hot brewed espresso to enhance the chocolate-coffee flavor.
- Add coffee buttercream frosting between layers.
- Dust the top with cocoa powder and instant espresso powder for a coffeehouse-inspired finish.
7. Raspberry-Filled Chocolate Cake
- Spread raspberry jam or fresh raspberry puree between the cake layers before adding ganache.
- Garnish the top with fresh raspberries and dark chocolate shavings.
- Add a touch of orange zest to the batter for a slight citrus contrast.
These variations allow you to put your own spin on the classic Matilda Chocolate Cake, making it suitable for different dietary needs and flavor preferences.
Final Thoughts on Serving, Storing, and Variations
A perfectly baked Matilda Chocolate Cake is best enjoyed with the right accompaniments, stored properly to maintain its moisture, and customized for those who love experimenting with flavors. Whether served with vanilla ice cream, fresh berries, or a drizzle of caramel, this cake is a decadent treat that’s perfect for any occasion.
By following these serving and storage tips, you can ensure that every slice remains as rich, moist, and fudgy as the day it was baked. If you’re feeling adventurous, try one of the exciting variations to give the classic chocolate cake a unique twist.
Conclusion
The Matilda Chocolate Cake is more than just a dessert—it’s a symbol of indulgence, nostalgia, and pure chocolate bliss. Inspired by the iconic scene in Matilda, this cake represents the ultimate treat for chocolate lovers, delivering a rich, fudgy, and moist texture with every bite.
By following the step-by-step guide, using high-quality ingredients, and applying expert baking techniques, you can recreate this legendary chocolate cake in your own kitchen. Whether you’re making it for a special occasion, a family gathering, or simply satisfying a chocolate craving, this cake is guaranteed to impress.
Why This Cake is a Must-Try
- Incredible Chocolate Flavor – The combination of Dutch-process cocoa, hot coffee, and chocolate ganache ensures an intense chocolate experience.
- Moist and Fudgy Texture – Buttermilk, oil, and the right baking method help keep this cake soft, rich, and never dry.
- Simple Yet Decadent – Despite its impressive look and flavor, this cake is easy to make with pantry staples.
- Customizable – Whether you prefer a salted caramel drizzle, peanut butter twist, or gluten-free version, this cake can be adapted to suit different tastes.
Bringing the Matilda Magic to Your Kitchen
Baking the Matilda Chocolate Cake is an opportunity to enjoy a piece of nostalgia while creating a homemade dessert that’s as comforting as it is indulgent. The rich chocolate ganache cascading over the cake, the velvety texture, and the deep chocolate notes make this a showstopper for any occasion.
If you’ve never baked a from-scratch chocolate cake before, this is the perfect place to start. The recipe is beginner-friendly while still delivering professional-level results. The step-by-step instructions ensure that you can bake with confidence, knowing your cake will turn out perfectly moist, fudgy, and delicious.
How to Take Your Cake to the Next Level
- Presentation Matters: Garnish with chocolate shavings, cocoa powder, fresh berries, or a dusting of powdered sugar for an elegant touch.
- Pair it Right: Serve with a scoop of vanilla ice cream, fresh raspberries, or a drizzle of salted caramel for an even more indulgent treat.
- Make it Ahead: This cake stores well, so you can bake it a day in advance and let the flavors deepen for an even richer taste.
Let’s Get Baking!
Now that you have all the tools, techniques, and expert tips, it’s time to put them into action and bake the ultimate Matilda Chocolate Cake. Gather your ingredients, preheat your oven, and prepare to experience the most decadent chocolate cake you’ve ever made.
Once you’ve tried this recipe, share your experience in the comments! Did you add a personal twist? How did it turn out? Let’s keep the baking magic alive by spreading the joy of homemade chocolate cake.
4 thoughts on “Matilda Chocolate Cake – How to Make a Decadent, Gooey Treat”